Cortex Installer
The Cortex Installer is the recommended way to install Cortex in IIS on Windows Server.
It walks you through each configuration step with a guided UI, handling IIS setup, application pool configuration, file deployment, and database connection setup. Most customers should use this method unless deploying via containers.
Before You Start
Make sure you have the following on hand before launching the installer:
- Administrative access to the target Windows Server
- Your SQL Server hostname, database name, and credentials
- Your Cortex license company name and license code
- Your authentication provider details (if configuring SAML or OpenID Connect)
Step 1 - Download and Launch the Installer
Download the latest Cortex Installer from:
https://releases.synapsesoftware.com/
If you do not run the installer as an administrator, it will prompt you to relaunch with elevated permissions before continuing.
On launch, the installer will check for required prerequisites and display the result in the Prerequisites screen.
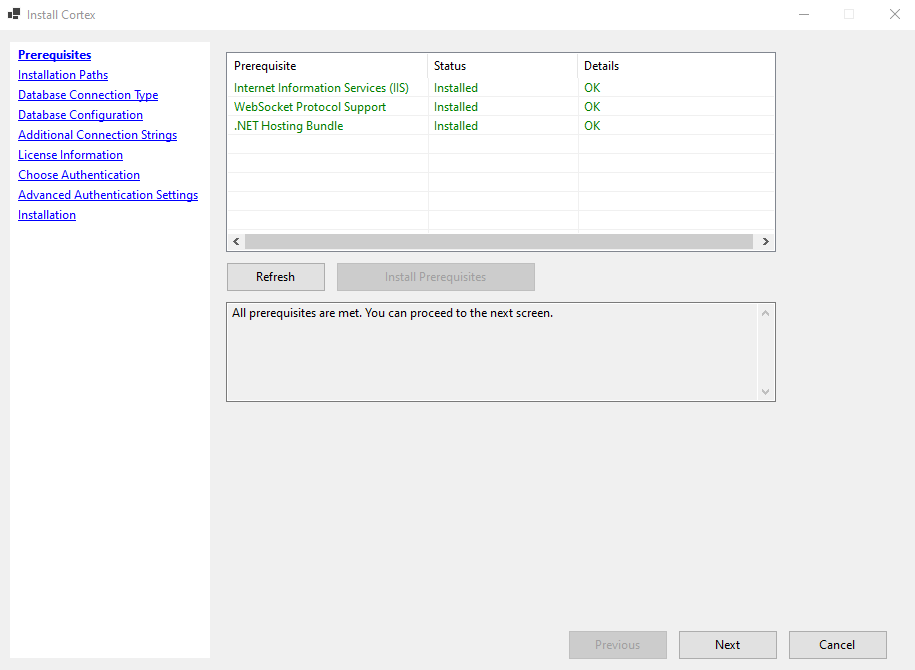
The installer checks for:
- Internet Information Services (IIS) - must be installed and enabled
- WebSocket Protocol Support - required for real-time features in Cortex
- .NET Hosting Bundle - required for IIS to run .NET applications
If all items show Installed / OK, click Next to continue.
If any prerequisite is missing:
- Click Install Prerequisites.
- Allow the installer to configure the missing components.
- Once complete, click Refresh to confirm all checks pass.
- Click Next to continue.
Step 2 - Installation Paths
Set the location where Cortex will be installed and the IIS alias it will be accessible under.
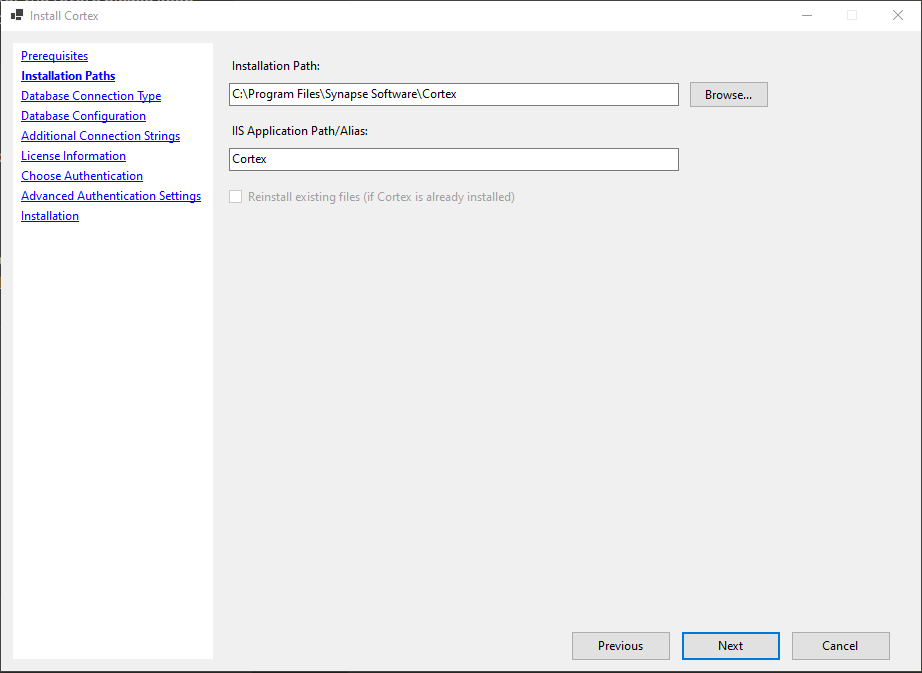
- Installation Path - the folder Cortex files will be copied to. Defaults to
C:\Program Files\Synapse Software\Cortex. - IIS Application Path / Alias - the path segment used in the URL to access Cortex. Defaults to
Cortex, making the app available athttp://YOUR_SERVER/Cortex.
If Cortex is already installed and you want to overwrite the existing files without triggering an upgrade, check Reinstall existing files.
Click Next to continue.
Step 3 - Database Connection Type
Choose how Cortex will connect to its own database.
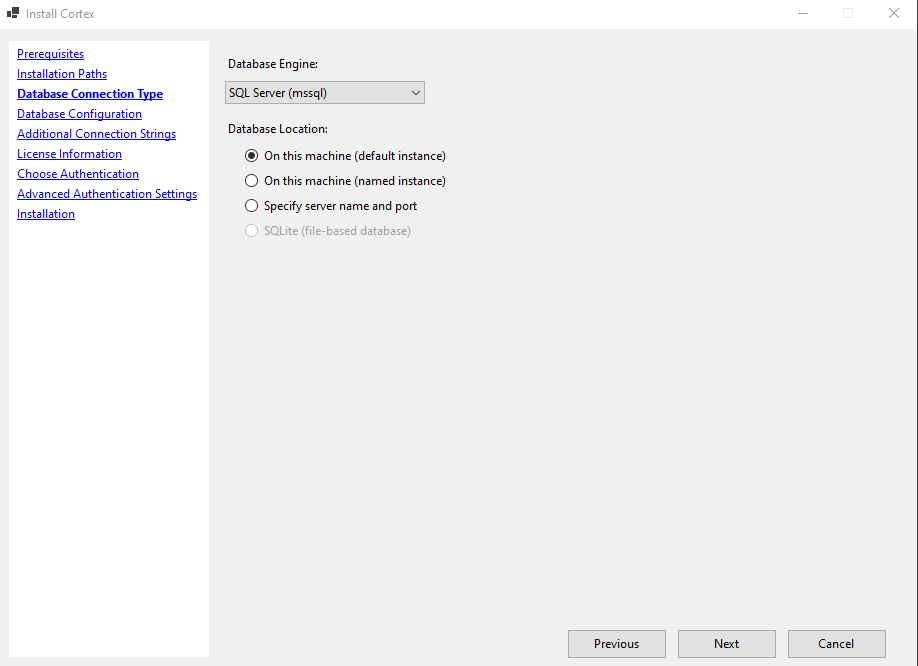
- Database Engine - select the engine your database runs on. SQL Server (mssql) is recommended and selected by default.
- Database Location - choose where the database is hosted:
- On this machine (default instance) - SQL Server is running locally using the default instance name
- On this machine (named instance) - SQL Server is running locally with a named instance
- Specify server name and port - SQL Server is on a different machine or uses a non-default port
- SQLite (file-based database) - for lightweight or testing deployments only
Click Next to continue.
Step 4 - Database Configuration
Configure the connection details for the Cortex database.
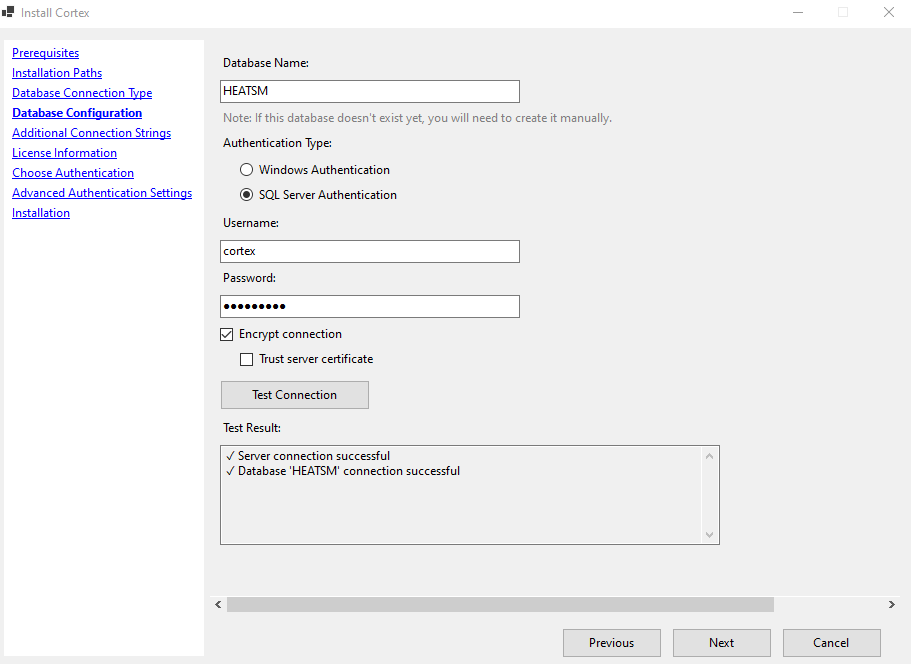
- Database Name - the name of the database Cortex will use for its own data. Defaults to
Cortex. If this database does not yet exist, you will need to create it manually before installation completes. - Authentication Type - choose how Cortex connects to SQL Server:
- Windows Authentication - uses the IIS Application Pool service account to authenticate. Recommended in domain environments.
- SQL Server Authentication - uses a SQL username and password.
- Encrypt connection - encrypts the connection to SQL Server. Enabled by default.
- Trust server certificate - check this if your SQL Server uses a self-signed certificate.
If using Windows Authentication, enter the IIS Application Pool Service Account credentials. The Application Pool will be configured to run as this account, which will be used for SQL Server authentication.
Use Test Connection to confirm the settings are correct before continuing.
Click Next to continue.
Step 5 - Additional Connection Strings
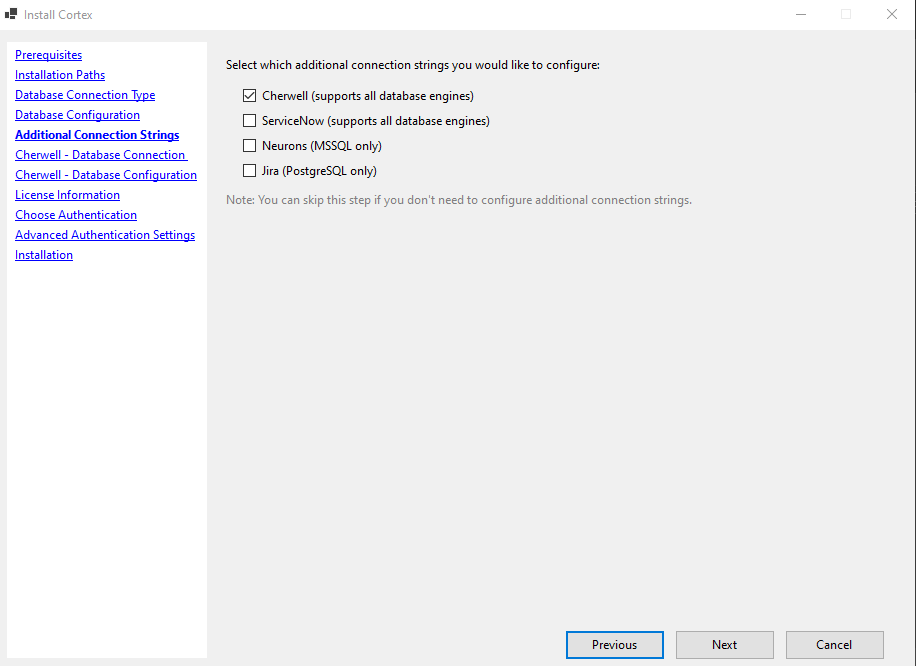
This screen is where you configure the connection to your source data (such as your Cherwell or Neurons database), separate from the Cortex application database configured in the previous step.
This step is optional. If you plan to manage source system connections through Cortex's in-app Data Sources interface, you can skip this step and configure those connections after installation. See: Database Connections
Any connections you do configure here will be written to appsettings.json and automatically imported as Data Source records when Cortex starts.
Select your source system below for the specific configuration steps.
Cherwell (CSM)
Connection Type
Select the database engine and location for your Cherwell database.
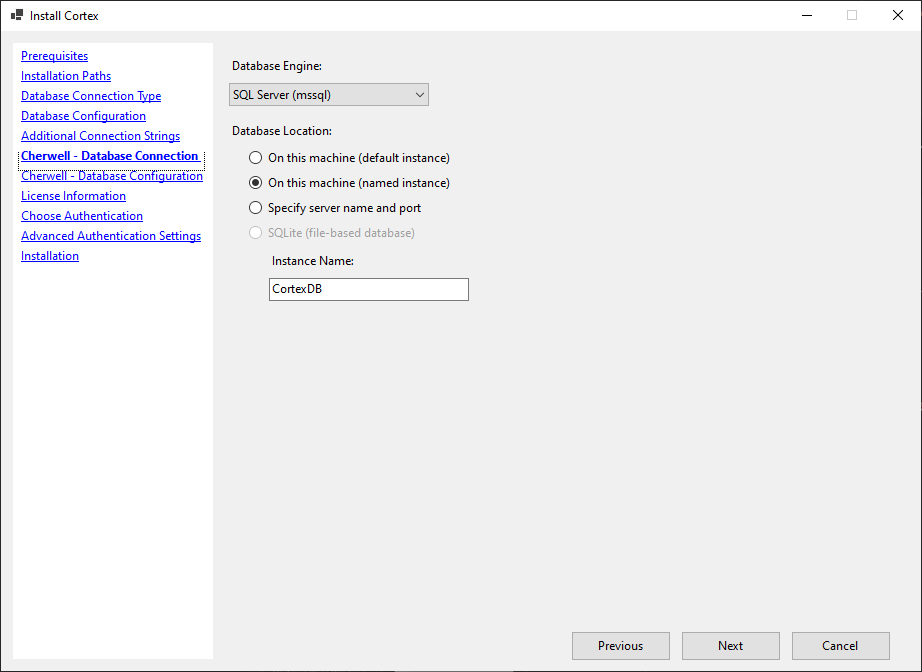
- Database Engine - select SQL Server (mssql) unless your Cherwell database uses a different engine.
- Database Location - choose where the Cherwell database is hosted:
- On this machine (default instance) - SQL Server is running locally using the default instance name
- On this machine (named instance) - SQL Server is running locally with a named instance
- Specify server name and port - SQL Server is on a different machine or uses a non-default port
Click Next to continue.
Database Configuration
Enter the connection details for your Cherwell database.
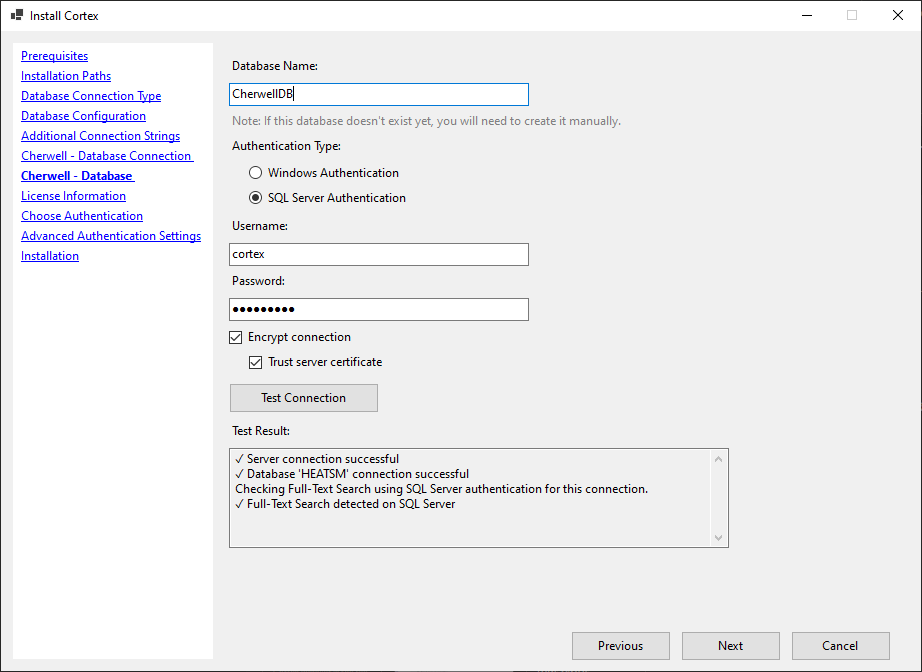
- Database Name - the name of your Cherwell database.
- Authentication Type - choose how Cortex connects to the Cherwell SQL Server:
- Windows Authentication - uses the IIS Application Pool service account.
- SQL Server Authentication - uses a SQL username and password.
- Encrypt connection - encrypts the connection to SQL Server. Enabled by default.
- Trust server certificate - check this if your SQL Server uses a self-signed certificate.
Use Test Connection to confirm the settings are correct before continuing.
Click Next to continue.
Ivanti Neurons
Connection Type
Select the database engine and location for your Neurons database.
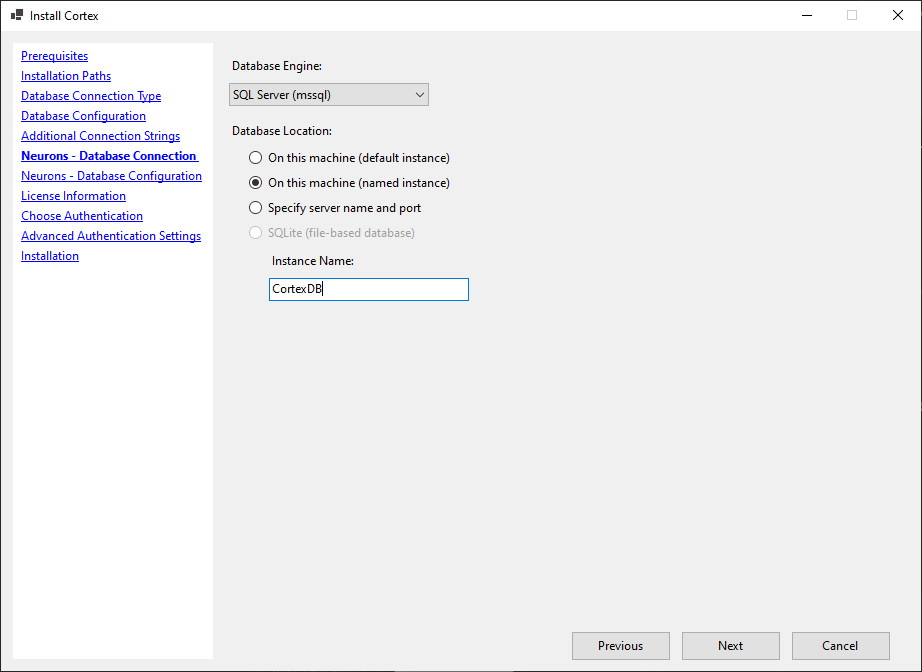
- Database Engine - select SQL Server (mssql) unless your Neurons database uses a different engine.
- Database Location - choose where the Neurons database is hosted:
- On this machine (default instance) - SQL Server is running locally using the default instance name
- On this machine (named instance) - SQL Server is running locally with a named instance
- Specify server name and port - SQL Server is on a different machine or uses a non-default port
Click Next to continue.
Database Configuration
Enter the connection details for your Neurons database.
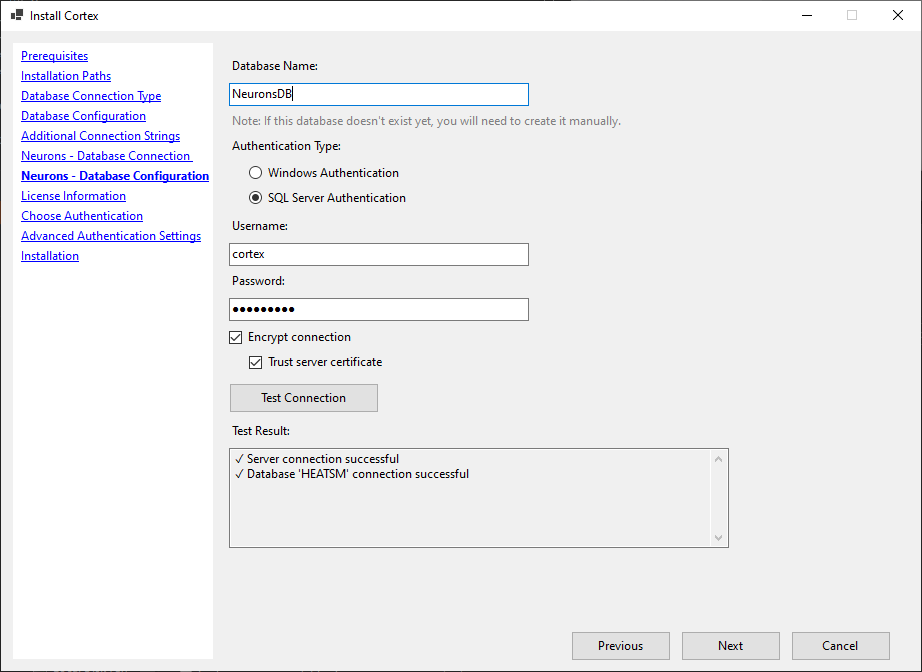
- Database Name - the name of your Neurons database.
- Authentication Type - choose how Cortex connects to the Neurons SQL Server:
- Windows Authentication - uses the IIS Application Pool service account.
- SQL Server Authentication - uses a SQL username and password.
- Encrypt connection - encrypts the connection to SQL Server. Enabled by default.
- Trust server certificate - check this if your SQL Server uses a self-signed certificate.
Use Test Connection to confirm the settings are correct before continuing.
Click Next to continue.
ServiceNow
Select the database engine and location for your ServiceNow database.
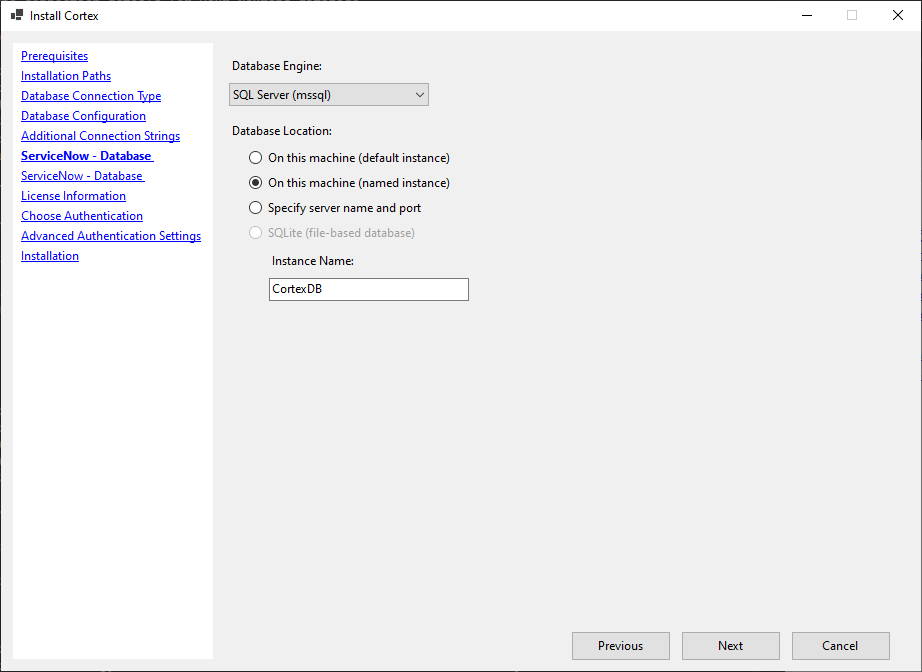
- Database Engine - select SQL Server (mssql) unless your ServiceNow database uses a different engine.
- Database Location - choose where the ServiceNow database is hosted:
- On this machine (default instance) - SQL Server is running locally using the default instance name
- On this machine (named instance) - SQL Server is running locally with a named instance
- Specify server name and port - SQL Server is on a different machine or uses a non-default port
Click Next to continue.
Database Configuration
Enter the connection details for your ServiceNow database.
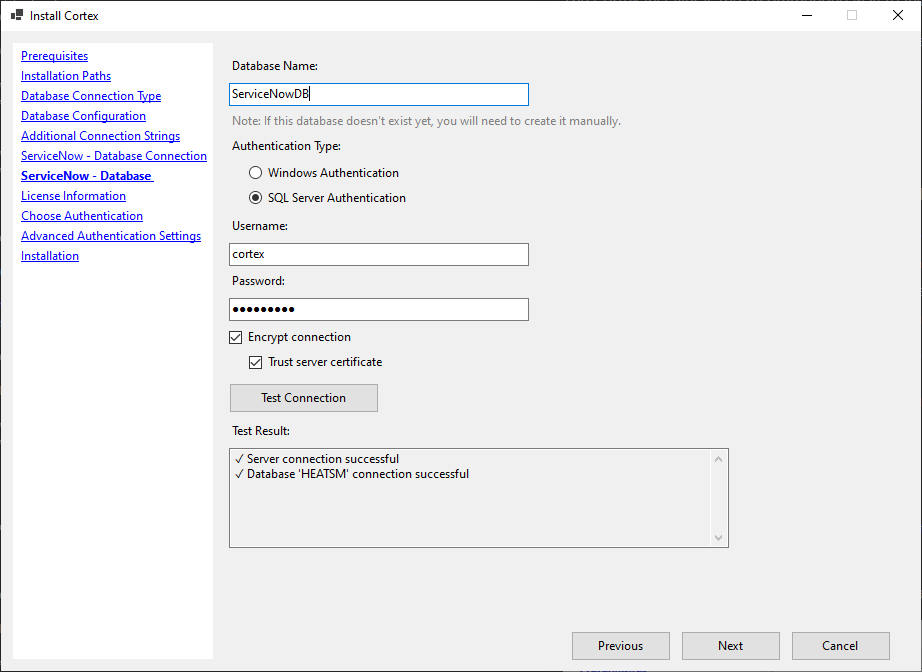
- Database Name - the name of your ServiceNow database.
- Authentication Type - choose how Cortex connects to the ServiceNow SQL Server:
- Windows Authentication - uses the IIS Application Pool service account.
- SQL Server Authentication - uses a SQL username and password.
- Encrypt connection - encrypts the connection to SQL Server. Enabled by default.
- Trust server certificate - check this if your SQL Server uses a self-signed certificate.
Use Test Connection to confirm the settings are correct before continuing.
Click Next to continue.
Jira
Connection Type
Jira uses PostgreSQL as its database engine. This is fixed and cannot be changed.
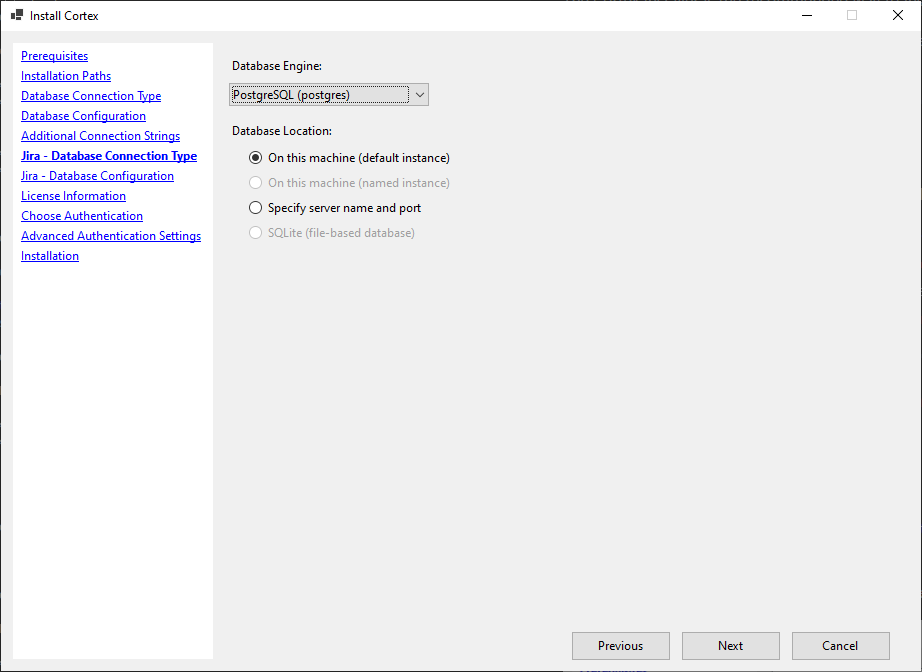
- Database Location - choose where the Jira PostgreSQL instance is hosted:
- On this machine (default instance) - PostgreSQL is running locally
- Specify server name and port - PostgreSQL is on a different machine or uses a non-default port
Click Next to continue.
Database Configuration
Enter the connection details for your Jira database.
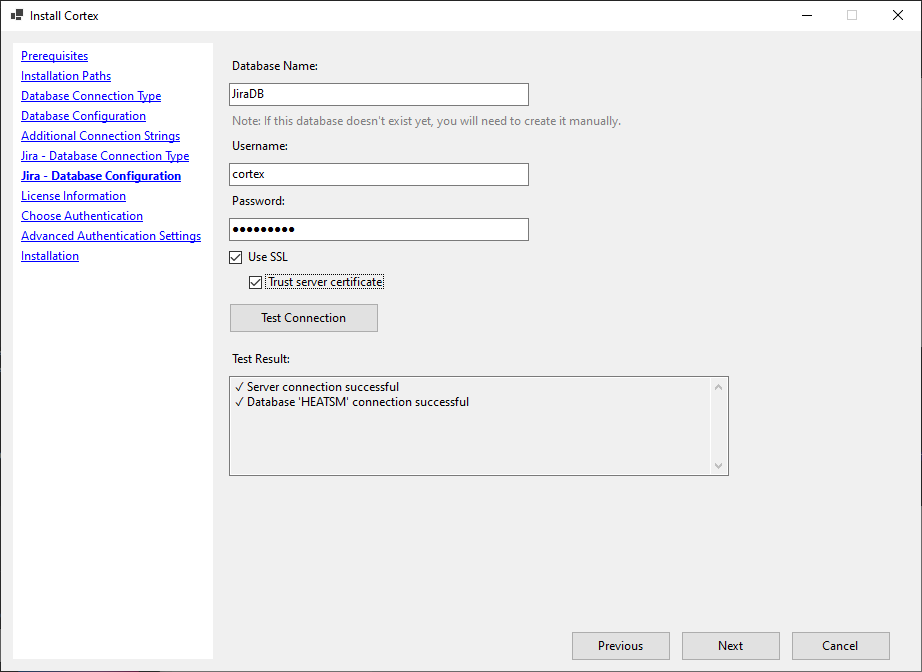
- Database Name - the name of your Jira database.
- Username - the PostgreSQL user Cortex will connect as.
- Password - the password for that user.
Use Test Connection to confirm the settings are correct before continuing.
Click Next to continue.
For full connection string reference, see: Connection Strings
Step 6 - License Information
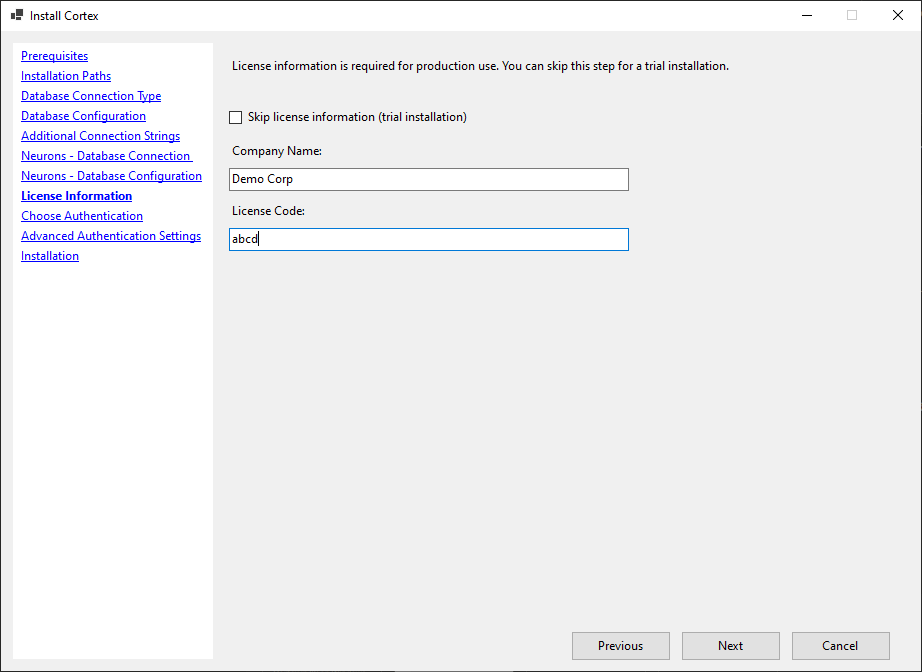
Enter your Cortex license details:
- Company Name - the company name associated with your license
- License Code - your license key (format:
XXXXX-XXXXX-XXXXX-XXXXX-XXXXX-XXXXX)
If you are doing a trial installation and do not yet have a license, check Skip license information (trial installation). Cortex will run with search results limited to 10 records. You can add your license later through the application settings.
Click Next to continue.
Step 7 - Choose Authentication
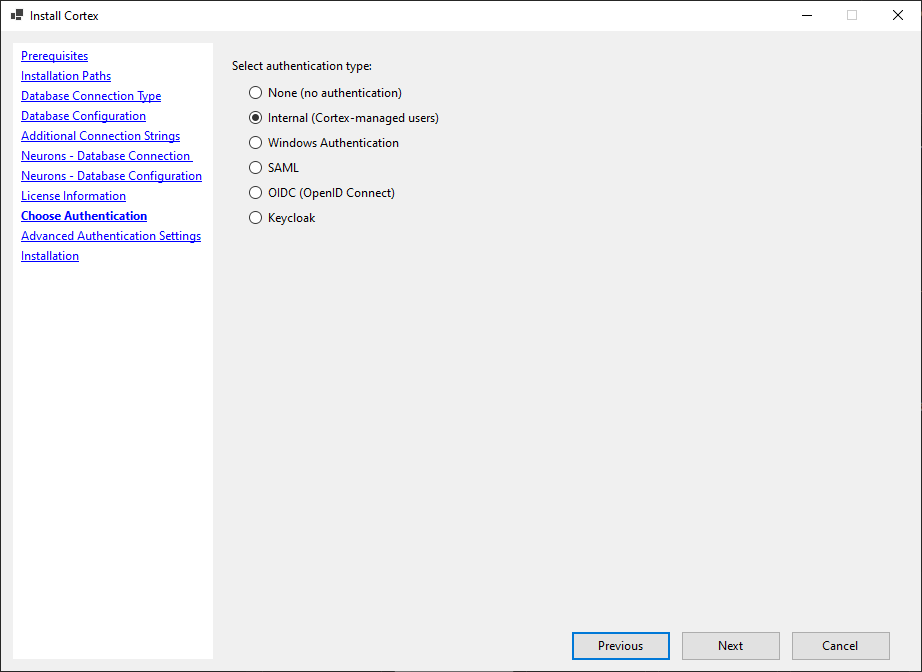
Select the authentication method users will use to log in to Cortex.
For details on each option and how to configure it, see:
Click Next to continue.
Step 8 - Advanced Authentication Settings
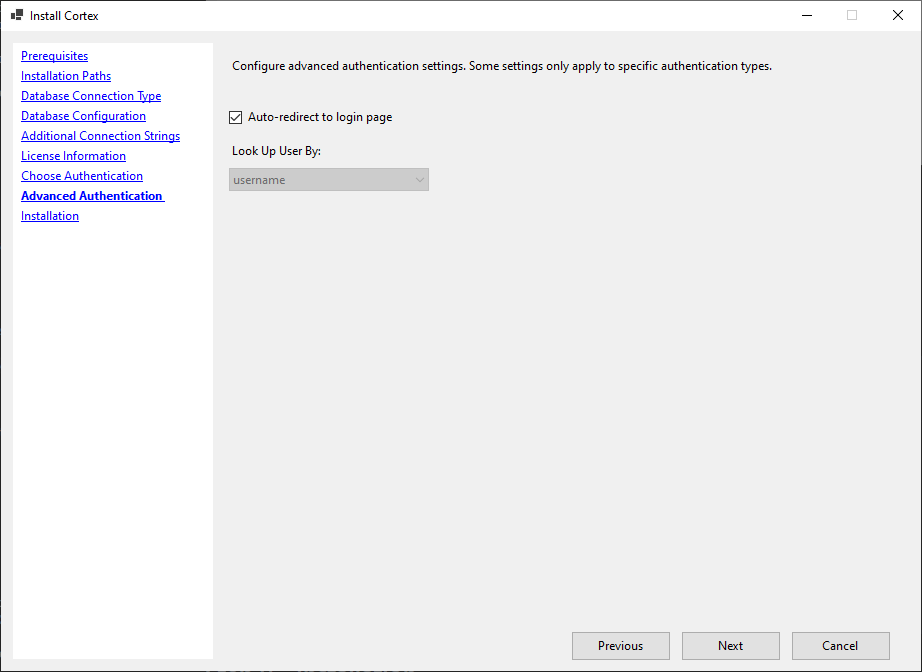 Please note: the above screenshot is an example of the advanced authentication settings screen for the Internal authentication option. The fields displayed on this screen will vary based on the authentication method you selected in the previous step.
If you selected SAML or OpenID Connect in the previous step, configure the provider-specific settings here, such as your IdP metadata URL and public URI.
If you selected None or Internal, this screen has no required fields.
Click Next to continue.
Step 9 - Installation
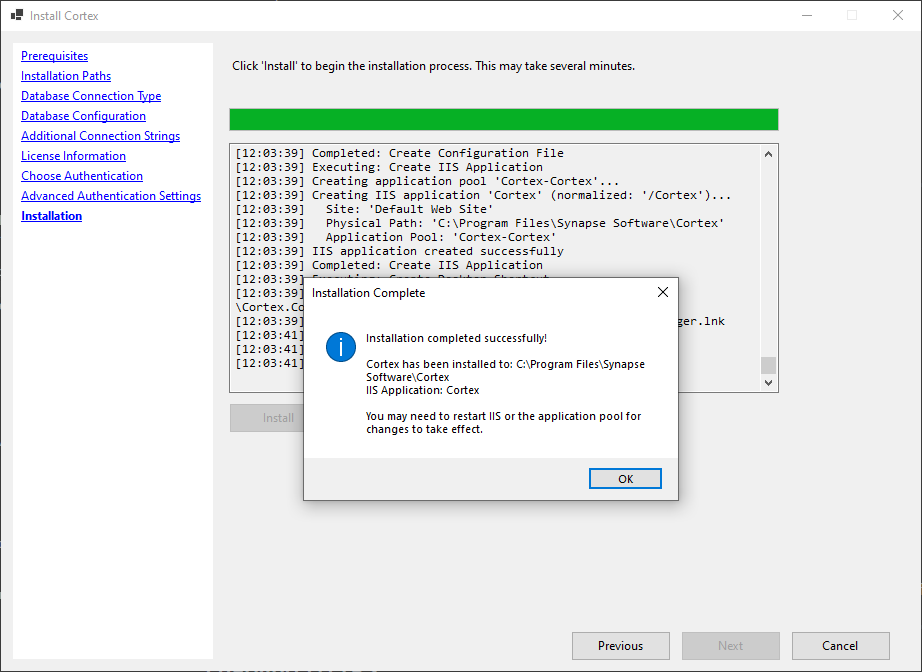 Review your configuration and click Install to begin.
The installer will:
- Copy Cortex application files to the selected directory
- Create or configure the IIS Application Pool
- Configure the IIS application
- Apply your database connection settings and license details
- Apply your authentication configuration
Once installation completes, click Finish.
Open a browser and navigate to your configured Cortex URL to confirm the application loads successfully.
Enabling HTTPS
By default, Cortex is installed using HTTP. HTTPS is strongly recommended for any production deployment, and is required if you are using SAML authentication.
SSL configuration is handled at the IIS level, not by the Cortex Installer.
To configure HTTPS in IIS after installation:
- Open IIS Manager.
- Select the Cortex site.
- Click Bindings.
- Add or edit an https binding.
- Select the appropriate SSL certificate.
- Apply changes.
If an SSL certificate is not yet installed on the server, add it to the Windows certificate store before selecting it in IIS.
If you add HTTPS after configuring SAML, you will need to update your SAML configuration to reflect the new URL.
Upgrading Using the Installer
For upgrade instructions, see: Upgrading Cortex
When Not to Use the Installer
Use a different path if:
- You are deploying via Docker or Kubernetes - see Install using Docker
- You are running Cortex on a non-Windows platform - see Install on another platform
Troubleshooting
If Cortex does not load after installation, see: