Upgrading Cortex
Upgrading Cortex Archive depends on how it was originally deployed. The process differs for IIS/VM and Docker-based deployments, but in both cases your existing configuration is preserved when using the recommended method.
- IIS or VM - use the Cortex Installer (recommended) or the manual file replacement steps
- Docker/containers - update the image tag and redeploy
For IIS-based environments, the recommended approach is to use the Cortex Installer, which automates the upgrade process.
All releases are available at: https://releases.synapsesoftware.com/
Recommended: Upgrade Using the Installer (IIS / VM)
If Cortex is installed in IIS or directly on a Windows Server or VM, the simplest and safest upgrade method is to use the installer.
Steps
- Download the latest installer from
https://releases.synapsesoftware.com/ - Launch the installer.
- Click Upgrade.
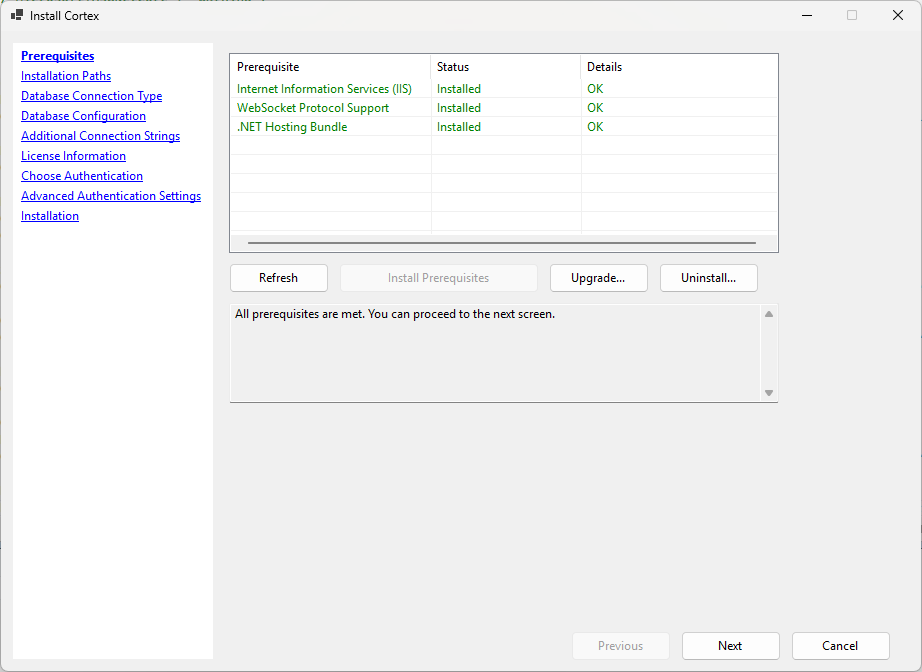
- Confirm the upgrade when prompted.
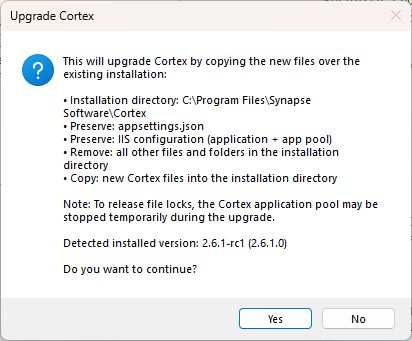
During the upgrade process, the installer automatically:
- Stops the IIS Application Pool
- Copies the new Cortex files over the existing installation
- Preserves your existing configuration (connection strings, authentication settings, application pool identity, etc.)
- Prompts you to confirm the installation directory or Application Pool if either was customized
- Restarts the IIS Application Pool after completion
After the installer finishes:
- Click OK.
- Open your browser.
- Validate that Cortex loads successfully.
No manual file copying or configuration restoration is required when using the installer.
Manual Upgrade (IIS or VM)
If you prefer to upgrade manually:
- Stop IIS (or stop the Cortex process if running directly).
- Make a backup of:
appsettings.jsonweb.config
- Delete all files from the existing Cortex installation directory.
- Download the new version from
https://releases.synapsesoftware.com/ - Extract the new version into the same directory.
- Restore your
appsettings.jsonandweb.configfiles. - Start IIS (or restart the Cortex process).
At present, no modifications to appsettings.json or web.config are required between minor versions unless otherwise stated in release notes.
Cortex v3.0.0: post-upgrade maintenance
When you upgrade an existing environment to v3.0.0, plan for these one-time admin tasks under Admin → System Settings → Maintenance. Most customers will have saved searches that need mapping; Cherwell customers will typically want the legacy settings import as well.
- Map saved searches to a data source — assigns a data source to saved searches created before per-data-source ownership.
- Import legacy Cherwell form settings — copies legacy global Cherwell form options into a Cherwell data source (Cherwell environments only).
Docker or Other Container Runtime (Kubernetes, etc.)
For container-based deployments, upgrading Cortex means updating the image tag and redeploying the container.
General Process
- Change the image tag to the desired version.
- Restart or redeploy the container.
Examples
docker run
Pull the new image, then stop and remove the existing container before starting a new one with the updated tag:
docker pull synapsesoftware/cortex:NEW_VERSION
docker stop cortex
docker rm cortex
docker run ... synapsesoftware/cortex:NEW_VERSION
Use the same flags you used on the original docker run command.
docker compose
Update the image tag in your docker-compose.yml, then pull and recreate the container:
docker compose pull
docker compose up -d
Kubernetes
Update the image tag in your deployment manifest and apply it:
kubectl set image deployment/cortex cortex=synapsesoftware/cortex:NEW_VERSION
Or update the tag directly in your manifest file and run:
kubectl apply -f your-deployment.yaml
Upgrading from 1.x to 2.0
Cortex now requires a read-write connection to its own database
Cortex does not require read-write access to your Cherwell data and never will. The read-write requirement applies only to Cortex's own configuration database.
Many features in Cortex 2.0 require storing configuration data in a database. You can satisfy this using any of the following options:
- Use the
Cherwell/Defaultconnection string with a read/write SQL user - Use the
Cherwell/Defaultconnection string with a SQL user that has read/write access to thecortexschema only - (Recommended) Use a separate
Cortexconnection string pointing to a dedicated Cortex database on the same server - Use a separate
Cortexconnection string pointing to a database on a different server, including PostgreSQL or SQLite
Cortex will create new tables in its own database
Cortex 2.0 automatically creates several new tables on first run. If you are not using the features they support, the tables will remain empty and consume negligible disk space.